
Cargo Trailer Camper Conversion
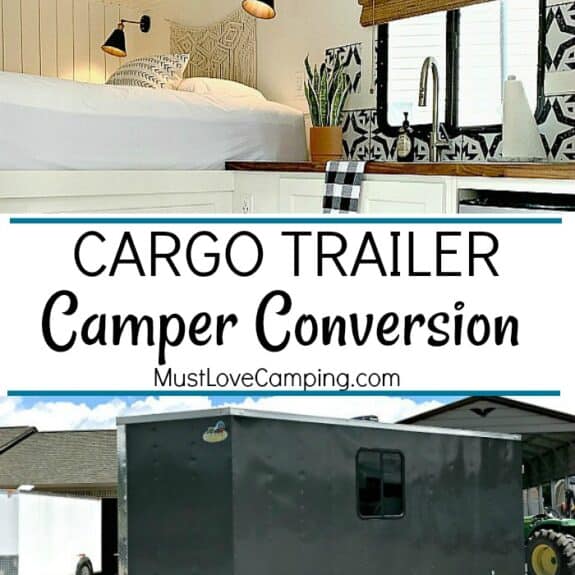
A timeline of projects for our 7 x 16 cargo trailer camper conversion. This was an 18 month long journey and labor of love to turn a cargo trailer into a comfortable and beautiful RV.
After more than a year and a half of hard work we are finally ready to say that Minnie, our cargo trailer conversion, is done and ready for the road.
It’s been a lot of work but we are so thrilled with the way it’s turned out.
We knew what we wanted it to look like but seeing our vision go from paper to reality is beyond exciting.

There’s a video with a complete tour of the inside and outside of Minnie that you can check out on our YouTube channel (link at the end of the post). We are also offering a 2D floor plan of our cargo trailer conversion. Check out the link at the end of the post.
Let’s start at the beginning…
We have been camping our whole lives, first with our families when we were growing up and eventually with our girls as they were growing up.
Actually, we met while camping with our families when we were young little pups so camping is sort of in our blood.

When we moved to Florida several years ago we had to sell our RV because we didn’t have room to store it. It only took a year or two and we started to feel the pull of the great outdoors.
We ended up buying a pop-up and camping in that for a few years. When we moved to Illinois camping once again took a back seat. Then we moved to North Carolina, where we are today, and decided that we needed to camp again.
This time though, we were going to create exactly what we wanted.We’ve always wanted to build our own camper but we both had two very different ideas on how to do it. I wanted to buy a cute little vintage trailer, completely gut it and rebuild it.
The mister wanted to buy a cargo trailer and build that up from nothing.
It took a couple of years to convince me but I finally leaned his way. The tipping points were water damage and a bathroom.
We looked at several old RV’s before we settled on the cargo trailer idea. Every trailer that we looked at had water damage, a common problem in older RVs.
We could definitely fix it but didn’t want to deal with those kinds of issues.
I wanted vintage and we looked at those too, but many smaller RVs don’t have bathrooms, or room for a bathroom.
Not having a bathroom was a deal breaker for me so, regrettably, we moved away from vintage trailers.
We also looked at new RVs. Actually, we looked at a lot of new RVs.
They just don’t make them very well anymore, and they are pretty expensive.
We knew that we could do better so I conceded to the hubs and we went and ordered a cargo trailer.
Our trailer was custom made to our specifications. We had 3 RV windows installed, an RV door with a window and gray colored metal on the outside.
Ours would have barn doors and 7 foot ceilings to make it feel more spacious. We don’t have a lot of room to store an RV at our house so we went smaller with a 16′ long trailer.
Even with the addition of a few upgrades, we came in way cheaper than a typical RV. All we had to do was to build it up to fit our needs. Easy, right?

We waited 6 weeks for our trailer to get built and brought it home to begin it’s transformation. That was back in August of 2017.
Little did we know that it would take almost two years to finish our project.
We didn’t start any construction until February of 2018 but we were busy behind the scenes.
Planning and discussing all of the projects that we would have to do in order to get it ready for camping.

This was an early layout of our 112 square foot space. It ended up looking very similar to this, except for the placement of the shower and toilet.
I had to concede my trailer choice but Roger also had to make concessions.
He was fine slapping a mattress in there, with a/c and calling it a day.
Ummm….not gonna happen on my watch.
I agreed to a cargo trailer but it had to look good, like a real RV, and it had to have a bathroom. I wasn’t willing to give up on either issue.
Finally in February of 2018, we were ready enough to start building.

The first project that we tackled was the ceiling. We insulated it and installed tongue and groove planks. We also wired the ceiling for 12 volt lighting.

Next, we built a platform bed with storage drawers underneath. A shiplap wall was also built to separate the back barn doors and offer more stability for the bed.
We were anxious to go camping so our next project was the a/c. We decided to go with a dual hose portable unit so that we didn’t have to cut a hole in the ceiling (hello, water!) or the side.
Before we installed it we did a little experiment with a single hose vs. dual hose a/c.
You can check out the video, here.
With the a/c up and running, we threw a mattress on the platform and took our first camping trip.
We didn’t have running water, and we made a DIY canopy from a $10 piece of plastic, but we had a relaxing weekend. By this time we had been at it almost 4 months and needed a break.

We learned a lot from that first little weekend away.
It helped us to figure out what we needed and what we didn’t. It also gave us the motivation to keep going.
The next project was the vinyl plank flooring. We discussed painting the wood floors but in the end, we went with planks.
I’m glad that we chose them. They look great and have held up well with the dogs (plus, I didn’t have to paint them).

While we were doing the floors, I got busy painting the walls. Oy…I lost count of the coats that I had to put up. I think it was 4 or 5. In other words…a lot of paint.
It did wonders for the inside though. So light and bright!

With the walls and floors complete, we moved on to framing out the rest of the king size bed. We built drawers for storage and moved on to the kitchen.

RV Kitchen
In order to separate the kitchen from the bathroom, we had to build a wall. Then we framed out our cabinets and prepared them for the countertop.

We had gotten our hands on a 12′ slab of walnut for the countertop and I had to refinish it before we could install it.
It took me two weeks, and working on it every day, to get it ready and waterproofed.

Finally, we installed the walnut butcher block countertop, the sink and faucet and Roger moved on to the electric.

Lights and Electrical
Besides the 6, 12 volt disc lights on the ceiling, we installed 2 sconces over the bed and a flush light over the kitchen sink. The lights are just normal fixtures that you would see in a house (I found them here).
I just added a 12 volt bulb to each one so that we could run it off of battery if needed.

He also ran electric for the a/c, refrigerator, several outlets, including light switches next to the bed and by the door, and an exhaust fan for the shower.
Running the electric took a few weekends to complete but it went smoothly.
Next, he ran all the plumbing, from the kitchen sink to the toilet and the shower. We didn’t add any tanks to the RV so we are not self-contained, but we can still camp at campgrounds with hookups.
Maybe someday we’ll add the equipment needed to go boondocking, but we’re just looking to get away for weekend trips.
RV Bathroom
With the kitchen in working order (minus the cabinet doors), we moved on to the front of the RV and the shower.

This part of the process was tough. A lot of discussion and planning went into it so that we had a working shower that was watertight.
Not an easy task when you have to build everything custom. We placed the shower in the v-nose (front of the trailer) and carefully built it from scratch.
Once the walls went up and the floor was in, we waterproofed everything with 7 coats of Red Guard.

Next, we installed the corrugated metal, marble threshold and the shower head.

It was ready to use but we had some finishing touches to do before we could call it done, like an RV DIY wood shower mat.
With the shower shaping up I installed our 3 new window coverings, room darkening woven bamboo shades.
They are definitely a far cry from the towels that I hung from temporary rods for our first two trips out. I think I may have even hung Roger’s t-shirts up to block the sun.
Adding the Finishing Touches
In between all of that, I also worked on our DIY upholstered storage ottomans. We needed something that was multi-functional so I came up with a simple design and built exactly what we needed.
Now we have 2 stools for our drop-down table, extra storage space for dirty laundry and extra blankets, and a step stool so that we can get into our bed.

While I was busy with my projects, Roger was busy installing the new RV toilet and plumbing. The bathroom that I had wished for was really taking shape.
Granted, I don’t have a vanity and sink but the kitchen sink is sufficient for our needs.

After we finished the plumbing we worked on the finishing touches which included cabinet doors and trim.
Remember, every piece is custom and that includes the cabinet doors and ceiling trim.
What a difference they made in the space. The new doors and drawer faces brought everything together.

RV Kitchen Backsplash
Next, I worked on the RV kitchen backsplash. I tried peel and stick tile, twice, but eventually ended up using self-adhesive removable wallpaper.
So easy to put up and I love how it turned out.
I also added 2 shelves from the leftover walnut butcher block that we used for the kitchen countertop.
Because we only have 100 square feet of living space we decided to not install a stove.
We have an induction cooktop that we bring with us, as well as a grill, so cooking a proper meal hasn’t been an issue.

The last project was the trim around the ceiling and on the wall that we built to separate the kitchen and bathroom.
We had every intention of installing a door for the bathroom but decided that we didn’t want to close in our already tiny space. Maybe down the road we’ll decide to do something different but it works for us right now.
Sometimes you have to make adjustments like that when you’re building a small space.

The final step was to decorate with a few well-chosen accessories.
I wanted to make our traveling home away from home feel more welcoming and comfortable so I added a few pillows, a macrame wall hanging and a couple of faux plants.

Cargo Trailer Conversion Garage
Not many RV’s or cargo trailer conversions have their own garage. This space was a must-have for Roger so we had it all planned out from the beginning.
We created enough space for the water heater, all the electrical and the spare tire. Also it’s where all of our camping gear lives so that we don’t have to store it in our living space.
We love all of the extra storage and it’s so easy to reach all of our utilities.

The Outside of our Cargo Trailer Conversion
The outside of the trailer hasn’t seen much action but we did install a custom awning. It helps protect us from sun and rain, and I really love the stripes.
Even with the awning installed, we still have a few projects on the outside to finish up, like caulking the windows and door, but Minnie is more than ready for action.
We’d like to go boondocking at some point so we’ll eventually have to add a generator and black or gray water tanks. Those projects are way down on our “someday” list and not something that we’re worried about doing right now.

So that’s a wrap! We are thrilled with the way our cargo trailer camper conversion turned out and so excited to go on lots of adventures.
Of course we’re a bit sad that the whole process is over but we’re hoping to build a bigger version…soon!
Thanks so much for following along with us on this journey.
Don’t forget to head over to our YouTube channel and check out our videos, cargo trailer conversion reveal tour and our Q&A video. And check out our 2D floor plan that we’re offering (after a ton of requests).
RV Sources
As an Amazon Associate and member of other affiliate programs, I earn from qualifying purchases.
- Wall sconces and flush light over kitchen – (similar)
- Macrame wall hanging – Etsy
- Walnut butcher block (used for countertop, shelves and table) – Floor & Decor
- Flooring – Home Depot
- Kitchen backsplash – Loomwell
- Dometic RV toilet
- Woven window shades – Blinds.com
- Kitchen faucet, shower head, robe hooks and toilet paper holder – Pfister
- Cabinet pulls – Home Depot
- Awning – Carefree of Colorado
This is a really nice conversion. Probably the nicest I’ve seen. I just came back from living on a sailboat for a few years, and I think this type of project is calling to me next! <3
Thanks so much, Cheri! We really enjoyed building our cargo trailer and have loved using it. Wow, living on a sailboat sounds like a fun adventure. I’m sure you would enjoy cargo trailer camping. 🙂
Hi Kristi & Roger,
Hope this note finds you both well and safe.
Do think Roger could do a little video on the 12 amp and 30amp boxes. How the install went how do you go from the 12 to 30. Does that mean all your lights are 12v? We have wired home additions but this RV stuff seams to wiggle are brains,
We just love your trailer home. We purchased a 6 x 12. Waiting for dealer to deliver only to have them sell it to another person. Arghhhh. Starting over. Thanks BEE
Hi Bee! So sorry about your trailer misfortune. Hopefully the next order works out.
Roger is the electrician in the family so I will talk to him about making a video. I’ll send you a follow-up email. Thanks for checking out our build.
Hi – wondering if you would share your source for the trailer and if you would consider selling the plans for your project? Congratulations on your beautiful camper.
Hi Erika! Thanks so much for checking out our camper and for your nice comment. I would definitely consider selling the plans. Let me look into it and I’ll get back to you. Thanks again!
After seeing your videos, my husband and I are discussing how we could do this. Were you able to drill into the wood walls to mount the bed and kitchen cabinets or did you have to use an adhesive? We weren’t sure how long the screws would need to be so you didn’t pierce the metal on the outside.
Hi Amy! Thanks so much for watching our videos! Everything that we mounted in the trailer, the bed, the cabinets, etc., were secured with screws. I can’t really tell you the length because it depends on the thickness of the wood, the thickness of the wall and the space between the wall and outer skin of the trailer. We made sure to use extra care when securing a piece that required us to screw into the wall. It was nerve-wracking at times but I’m happy to say that we didn’t pierce the skin of the trailer once. Let me know if you have any other questions. 🙂
Do you have a Video or Blog post focusing on the actual build of the shower? We are getting ready to do a similar shower / bathroom build in our living quarter horse trailer and are looking for specifics on how to do this.
Love your trailer conversion!!
Thanks Amanda! We don’t have a post up right now but I am working on it, trying to get all the details included. Sorry about that.
Hi Kristi and Roger!
I absolutely love this conversion and am going to get a camper as well! I cannot wait to start. Do you mind sharing how much the total renovation cost you?
Hi Eman! Thanks so much for checking out our conversion and for your nice comment. Our complete conversion has cost us around $13K, which includes the cost of the trailer and the materials to build it. Hope this helps! Let me know if you have any other questions. Best of luck on your build!
Plumbing question. How do you flush your toilet or shower. Do you have a water holding tank and pump? Gray/black water, where does it go?
We don’t have holding tanks. We are either hooked up to sewer at a campground or we use our portable tank. We have a video that explains all of this if you want to check it out. https://youtu.be/AzYc0aK0yAI
We did a trailer conversion as well and love how it turned out! We use it mostly for dry camping and want to do another that includes a holding tank and water heater. I would love to see how you addressed these issues in your beautiful rv!
Hi Sharon! Thanks for stopping in and taking a look at our ctc. We actually don’t have any holding tanks in our trailer, we either camp at full hook-up campgrounds or take a portable tank. As for the water heater, we just use a small 7 gallon electric water heater. We were going to do a tankless but this one has worked out well for us so we stuck with it. Hope this helps.
Hi! I love your conversion. How much did it end up weighing and what type of car/truck do you pull it with?
Hi Katherine. The trailer weighs about 5000 pounds after the conversion and we pull it with a Ford F250.
This is beautiful!! We are building a camper from scratch, 7’ x 10’, similar layout but ours will not have a bathroom. I love how you decorated yours!
Thanks so much, Melanie! Best of luck with your build.
Very nice work you both did! One thing I can’t tell – are the barn-doors not functional in the completed build, or is there some space there and its a storage area, or?
Yes, it’s a storage area. A very useable space. I added a photo to the post but there’s more info in the video that’s linked in the post.
Really nice! Was all this cheaper then getting a pre-made camper? It looks absolutely beautiful but it looks very expensive.
Thanks Jason. Yes, it was way cheaper than getting a pre-made camper, plus the quality is much higher. It is a lot of work though.
It’s great that you described your whole cargo trailer conversion process. My wife and I are interested in buying a trailer for our camping adventures, but we don’t think we have the same type of commitment and skills as you and your husband did with your plumbing and all. That’s why we think we’ll look for a custom-made one next year.
Hi!
We’re are prepping our camper floor to install a vinyl plank floor. We had to repair the sub floor due to water damage and have removed the base cabinets and bed frame. I see that you painted under the bed frame, but what about under the cabinets? If you laid planks before installing the cabinets, did you screw down the cabinets through the vinyl planks? If so have you had any problems with the vinyl shifting?
Hi Lana.So sorry for the delay in my response. I was out of the office. My recommendation for painting the floor under the cabinets is to do it. We are currently building a new CTC and are painting all raw wood before we install anything. As for screwing down the cabinets through the vinyl planks, we did do that and have had no issues. We are going to do the same with the new trailer we are building. Hope this helps. Thanks. Kristi