
DIY Wood Bath Mat
This post may contain affiliate links, please see our policy for details.

How you can build a DIY wood bath mat for your RV, cargo trailer conversion or an outdoor shower with ipe (Brazilian walnut) that will last for years.
When we were building our cargo trailer, one of the most difficult projects that we tackled was the bathroom shower.
Like everything else in this cargo trailer conversion, the shower had to be built completely from scratch, which meant we had to build a wood shower mat for the floor.

Why build a bath mat from scratch?
Well…the main reason was because it’s an odd shape (the shower needed to fit it in the V nose of the cargo trailer).
Everything had to be built custom, including the walls, floor, drain and the bath mat.
We couldn’t just go to the home improvement store and pick out ready-made pieces.

I won’t go into the whole shower build in this post but I will talk about the finishing touch…the DIY wooden bath mat for the floor of the shower.
There is a How-To card with step-by-step instructions at the bottom of the post.
Since we didn’t have a pretty looking shower floor we decided to build a wood floor mat to disguise some of the ugly.
Of course it had to be custom, because of the shape, but it wasn’t really a difficult thing to make (once we figured it all out).

So, the biggest issue with building a mat for the shower was what kind of wood to use.
After all it was going to get wet so it had to be able to withstand wet conditions.
Teak is a great choice for using in wet conditions but it’s a popular choice, which makes it super expensive.
The next best choice was a wood called ipe (pronounced ee-pay), which is Brazilian walnut.
It’s a really hard wood and was perfect for this application.
It can get wet and it’s impervious to bacteria.
Like I said, this wood is really hard. So hard that when you hit it together it almost sounds like plastic.
Because it’s so hard it took special tools to cut and put it all together.
Luckily for us, Roger’s work has those tools so he spent one Saturday morning at work building our new shower mat.
Supplies for DIY wooden bath mat
- ipe or teak (we used 5 1/2 x 6′ decking planks)
- 1/4-20 x 1 1/4″ stainless steel flathead machine screw
- 3/4″ PVC cut into 1/4″ strips
- 3/4 x 1″ x 10″ piece of ipe (for bottom supports)
- Lexel
Tools required
- table saw
- miter saw
- tape measure
- clamps
- drill
- drill bits
- 1/4-20 tap and handle
- hex wrench
- counter-sink
How do you make a wooden bath mat?
Before we started the build we made a template of the shower floor with a large piece of cardboard.
This was a big help with getting the exact dimensions that we needed.
Then we used the cardboard template to lay out the wood so we could make it fit.
Next, Roger marked the wood according to the template.

Then he cut the wood planks with the miter saw.
He used a table saw to cut the angled pieces on two of the planks that would make the “v”.

We did a quick check of our cuts by laying all of the plank pieces on the template (using scrap wood for spacers).
Once we were happy with the cuts, we started working on the supports.
Roger cut the 3/4 x 1 x 10′ piece of ipe, again with the miter saw, to make the supports for the bottom of the bath mat.
We used 1 on each outer end and 2 in the middle (for a total of 4 pieces).

With the supports cut, we were ready to screw it all together.
Roger clamped the mat so it was slightly snug (with the wood spacers still in place).
Then he drilled, tapped and countersunk all of the support strips of ipe.

He attached the strips using stainless steel screws, tightening them with the hex wrench.
Disclaimer: hand tap the wood so you don’t strip the threads

After the bath mat was screwed together we did a fitting in the cargo trailer.
Heavy but a perfect fit!

Bath Mat Finishing Touches
For the final step we attached some vinyl strips to the bottom of the shower mat that were leftover from the shower build.
They are completely waterproof.

We used lexel, which is a waterproof sealant, to attach 4″ strips of PVC to the bottom supports strips of ipe.
They were necessary because they act as a guide so that the water from the shower can easily run into the shower drain.
Then we left it dry.
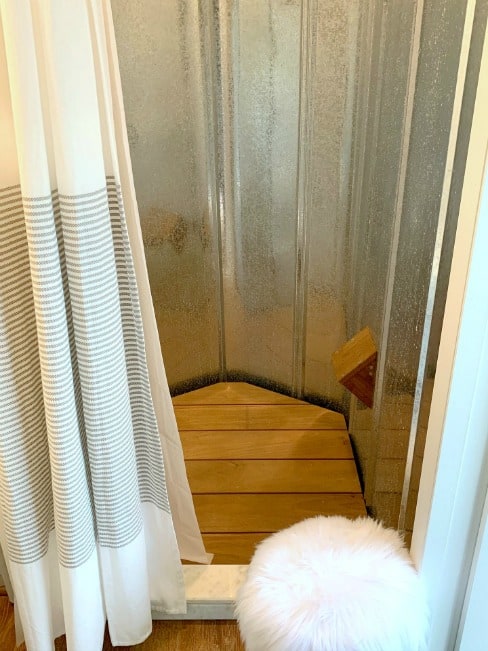
Now we have a custom shower mat for our little RV that will last years.

We had a bit of ipe left so I built a removable foot rest for the shower.
It’s perfect for washing dirty feet and shaving your legs and just like the shower mat, it’s built to last.

The whole RV shower turned out better that we’d ever thought. It’s perfect for our tiny cargo trailer conversion.
DIY Wood Bath Mat
How to build a DIY wood bath mat for an RV, cargo trailer conversion or an outdoor shower.
Materials
- ipe or teak (we used 5 1/2 x 6' decking planks)
- 1/4-20 x 1 1/4" stainless steel flathead machine screw
- 3/4" PVC cut into 1/4" strips
- 3/4 x 1" x 10" piece of ipe (for bottom supports)
- Lexel
Tools
- table saw
- miter saw
- tape measure
- clamps
- drill
- drill bits
- 1/4-20 tap and handle
- hex wrench
- counter-sink
Instructions
- Measure and make cardboard template of shower base
- Use the template to lay out the wood to make it fit
- Mark the wood according to the template
- Cut the wood planks with the chop saw
- Use a table saw to cut the angled pieces on two of the planks
- Check size of cuts by laying plank pieces on the template
- Use scrap pieces of wood as spacers for in between the planks
- Cut the 3/4x1x10' piece of ipe with the chop saw to make the supports for the bottom of the bath mat
- Lay out the ipe strips on the underside of the bath mat, 1 on each outer end and 2 in the middle (for a total of 4 pieces)
- Clamp the mat so it's slightly snug with the spacers still in place
- Drill, tap and countersink all of the support strips of ipe and attach strips using stainless steel screws
- Tighten screws with a hex wrench*
- Cut 4" strips of PVC for bottom of shower matUse Lexel, a waterproof sealant, to attach 4" strips to the bottom supports strips of ipe
- Let dry
- Place in shower
Notes
Note * Make sure you hand tap the wood so you don't strip the threads