
RV Kitchen Backsplash
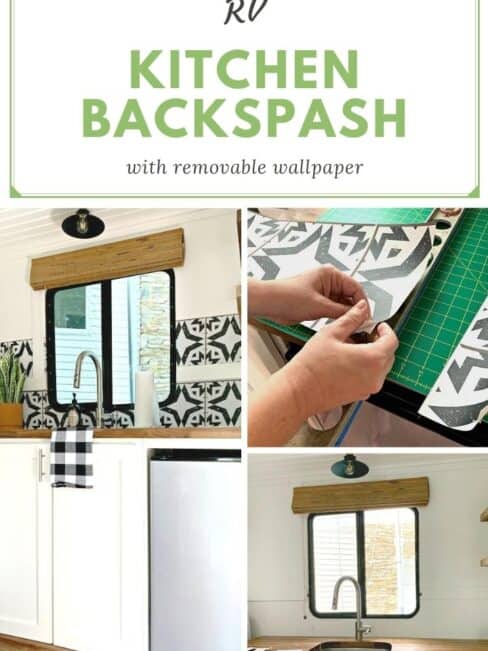
How to update an RV kitchen backsplash with removable, self-adhesive wallpaper. This is a quick and easy project that will update your RV kitchen.
We are getting down to the wire with our tiny cargo trailer camper conversion. Just a few more projects on the inside, like the install of an rv kitchen backsplash, and she will be complete.

I think…
I hope…
So, most of these last few projects are really about aesthetics…making sure Minnie is looking pretty.
She is roughly 100 square feet (give or take a square foot), so I can only do a minimal amount of decorating.
I’m trying to be meaningful and use things that have an impact, things that I really love. One place that I knew that I could do that is with the kitchen backsplash.
A little confession…
This is my third attempt at decorating this area.
My first and second attempts were with peel-n-stick subway tiles, and they just didn’t work. Not only were they difficult to put up but we weren’t crazy about the way they looked and there was a big issue with the tiles bubbling up.
We suspect it was the extreme fluctuation in temps and humidity that caused the issues but we’re not entirely sure.
I was ready to call it quits so I lived with the bare backsplash for a few months and searched for a something that spoke to me.
I was starting to look into wallpaper when I found this cool product. It’s a self-adhesive removable wallpaper made by a company I found online, Loomwell.

Just a note that this is not a sponsored post. I paid for my own product so my experience and opinions are definitely my own.
Let’s talk pros and cons of this removable wallpaper.
Pros
- self-adhesive
- removable
- beautiful designs
- easy to install
Cons
- pricey
As you can see, the only real con is the price. If you are doing a large area, the price can be steep. We have a small backsplash area so I only needed 3 panels (and I had a lot leftover) with a total cost of $80.
Not cheap by any means but if it worked, it was worth it to me.
So I measured the backsplash area in the RV, placed my order and impatiently waited for my panels to arrive.
Once they came I anxiously installed them on the kitchen backsplash.
Supplies to hang removable wallpaper
As an Amazon Associate and member of other affiliate programs, I earn from qualifying purchases.
- removable wallpaper panels
- smoothing tool (included in my order)
- utility knife
- level
- tape measure
- cutting mat
Installing removable wallpaper on a kitchen backsplash
The first thing I did was to make sure that the wallpaper panels would fit.
I used a bit of painter’s tape to help me out and placed each panel on the wall where it would go, making sure to match up the design.

When I was sure of the placement of the panels, I prepped the backsplash area for installation and removed the window trim.
We haven’t used the kitchen to cook in yet so our backsplash is pretty clean.

Next, I took my first panel, held it up to the wall again (I was paranoid that I would make a costly mistake), and cut it to fit the wall (starting in the corner).
I used a tape measure, utility knife and level to get my edges nice and straight.
After I cut the panel, I peeled the backing off halfway and started to adhere it to the wall. I went slowly and used the smoothing tool that they provided in my order.

The first panel went on quickly and smoothly and it was easy to readjust to get a perfect fit. I loved how it looked.
I moved on to the second panel and did the same. Dry-fitting one more time, measuring and cutting the panel.
This one went under and around the window so I had to trim a bit away once I installed it.
I did the same with the third and final panel, making sure I matched up the designs of the panels.

With all three wallpaper panels installed, I stepped back and checked my work.
I loved the way it look and the interest that it added, but I felt like the wall needed more.
I would have loved to remove the molding that goes across the wall but the gap between the pieces of wallboard is just too great so I had to work around it.
There was enough of the panels left to do another row above the molding so I did a quick dry-fit, making sure to match up the designs, and installed the rest of the wallpaper panels.
I started in the corner again and followed the same steps that I did for the bottom row.
This time I was able to put all three panels up in record time. I reinstalled the window molding and stood back to check out the final product.

I love how it turned out and the great thing about it is that I can easily remove it when I want a change.
Hopefully that won’t be for a long while.
Stopping in to read this as I’m debating….. we are redoing a little camper (no posts or pics on it in any of my social media yet) and trying to decide if I want a bold pattern on the kitchen wall. We took out the cabinets so it would be a larger area. I think it needs something.
It took me so long to find something I liked. Not sure why it’s easier to do my house than the RV. 😉